March 2023
General Updates
BrewSake.org had quite a month. We were so fortunate to have another great list of discussions and even more brewers joined in on the weekly calls. The website had a few tweaks, but were focused on making more content for the blog so please be patient while we organize the information and prepare new posts.

In the last 30 days we’ve seen a lot of interest in the website and had around 10 new members join the discord chat and our weekly calls.
Our discussion topics this month were largely around koji and water.
Starting off with an overview presentation from Mike S. on the Ueda method with resource links so you can learn more and try it yourself.
We collected koji making data from 14 brewers around the world representing Japan, US, Canada, Germany, Italy, Netherlands, Belgium, and Austria asking people how they grew koji for sake. The responses were eye opening and further indicates the diversity of both methods and philosophies of koji growing as well as intentions. We had 2 calls during which everyone did a walkthrough of their process and answered questions. See the details below.
Water chemistry is apparently the third rail of brewing discussion, but Reade H, our resident Master Brewer and Distiller, gave us some tips and warnings to look out for and other brewers added descriptions of their profile targets and the minerals and nutrients they consider essential. We’ve summarized the comments for you here.
Congrats to Two Rivers Sake in Sacramento, CA for acquiring its federal license to begin brewing! We’re so excited to see what you’re gonna make.
If you have ideas for a weekly discussion, have an article topic you could contribute, or feel you can add to the community in other ways, please contact us. The global sake community needs your skills!
Website Updates
For the sake of our purpose being loud and clear, we’re co-opting the motto of SciHub to loudly proclaim that “knowledge must be free” and we’ll do what we can to ensure unfettered access to anything we learn or produce.
This is not a change. It’s just an assertion that has a huge meaning to us. We’ll think of ways you can assist financially if you can and want to give, but what we will ask of you is just to participate: listen, share, and most of all, contribute your experience or skills to help us all rise up.
Please don’t give anyone money on our behalf. We don’t charge a subscription and if we ever ask for donations to help with projects, please verify that the domain is BrewSake.org
Thank you for your contributions of time and energy to our cause. Your participation in calls and discord discussions are invaluable to the world sake community. If a brewer you know is interested, tell them about us and let’s continue to learn together.We added a new page that contains playlists of some of the Media we’ve been amassing. These give substantial insight into Japan’s brewing processes as well as showing guided tours that expand upon the company’s history, product vision, and will often feature Q&A with the staff and Toji.
We’ve also tried to put together a list of tours from American and European breweries. This has been a bit of a struggle as not many have been made, but if you have a better tour video than the one we could find, please submit it. If nothing else, we really need some better tour videos to feature the western brewery life as it is quite different from that of our Japanese counterparts and should be shared so people can appreciate the wonderful differences in each.

Blog Updates
Still hard at work writing articles that can help new sake brewers adapt to the differences from other types of fermentation and boost the level of technical discussion at the pro-brewer level. This month we added a few more:
Measuring the Acidity of Sake by Titration - The tried and true method that doesn’t require expensive equipment
The Ueda Koji Method adapted for small scale brewing

Chemistry of the Aroma and Taste of Sake or rather a living document we will continue to add images, molecule diagrams, sensory evaluation details, and non-chemical options for developing your sense of the associated aromas and tastes.
Next month we’re hoping to complete (titles not final):
Amazake Yeast Starter (ko-on sokujo)
Measuring the Progress of your Sake Batch
Brewer Calls and Discord Chats
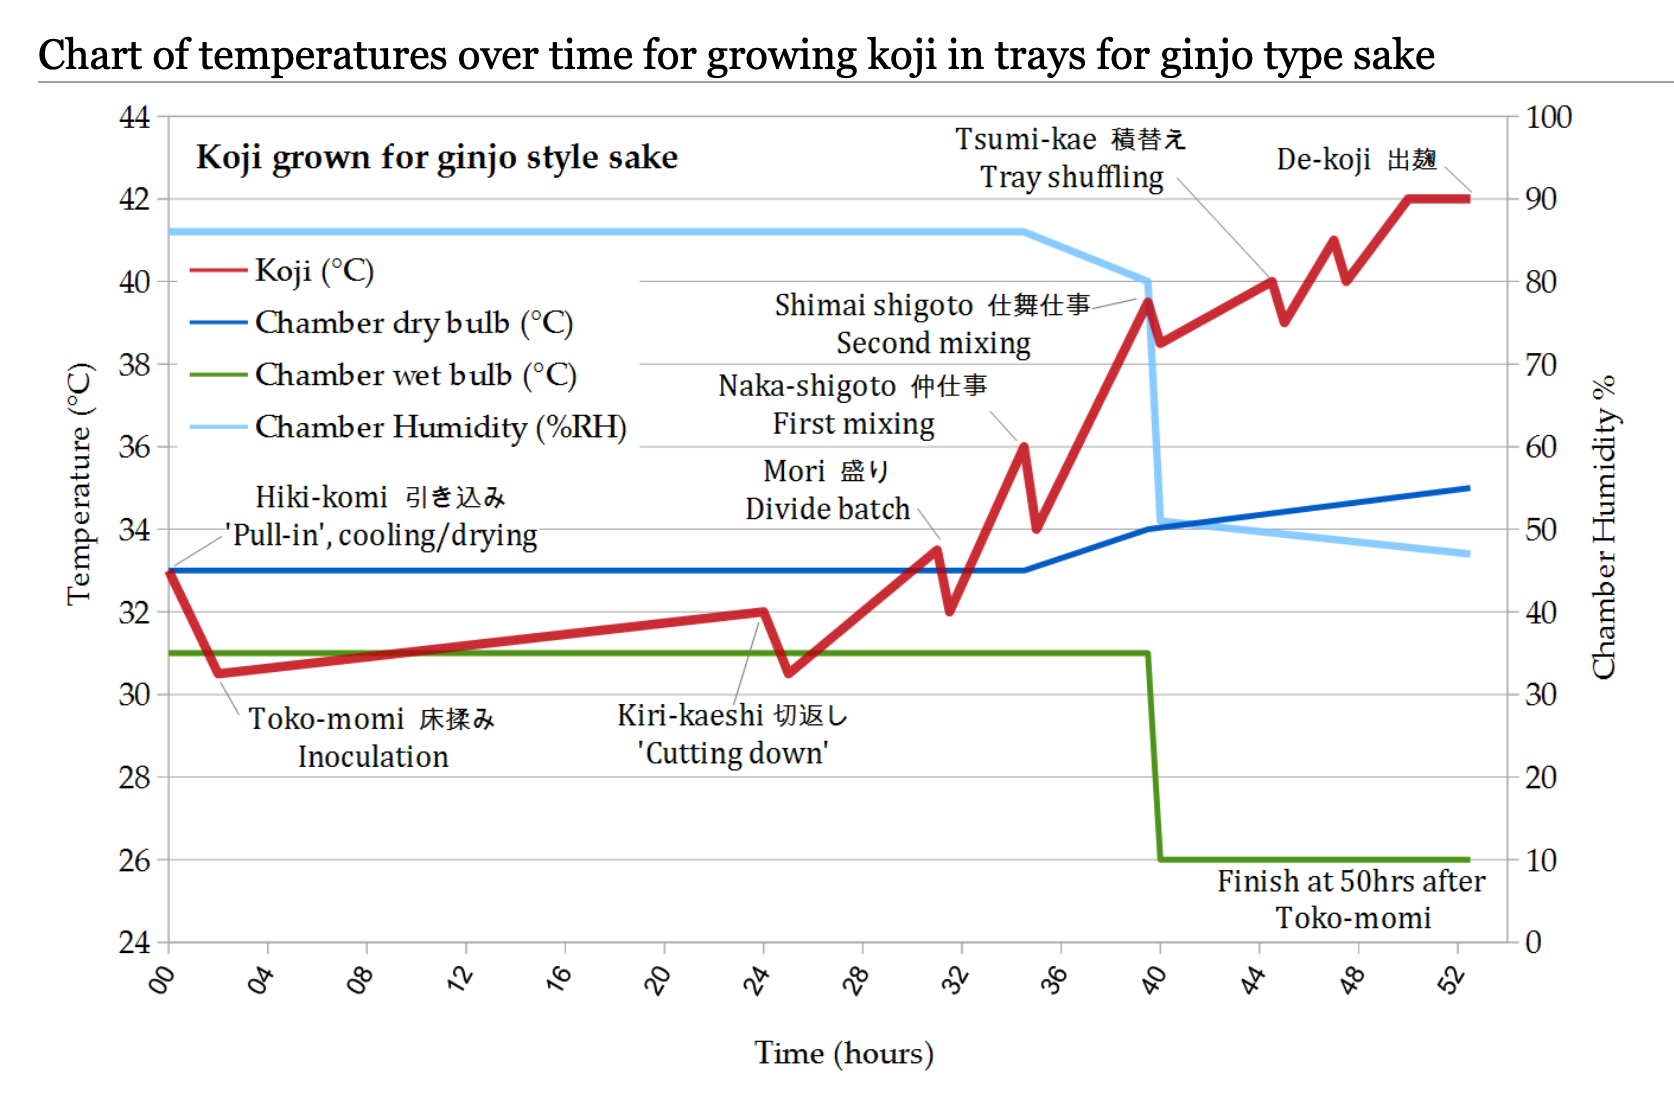
Ueda Koji Method
Mike S. gave an overview and advocated for use of the Ueda koji method. The presentation was not designed to be a walk-through of the steps, but rather to inform us of the purpose behind the advancement in koji growing research and to that end, the incredible benefits that this method has over the traditional process. You can find his adaptation for home-brewing on the blog under The Ueda Koji Method and if you are looking for the original article translation, please reach out on the discord.
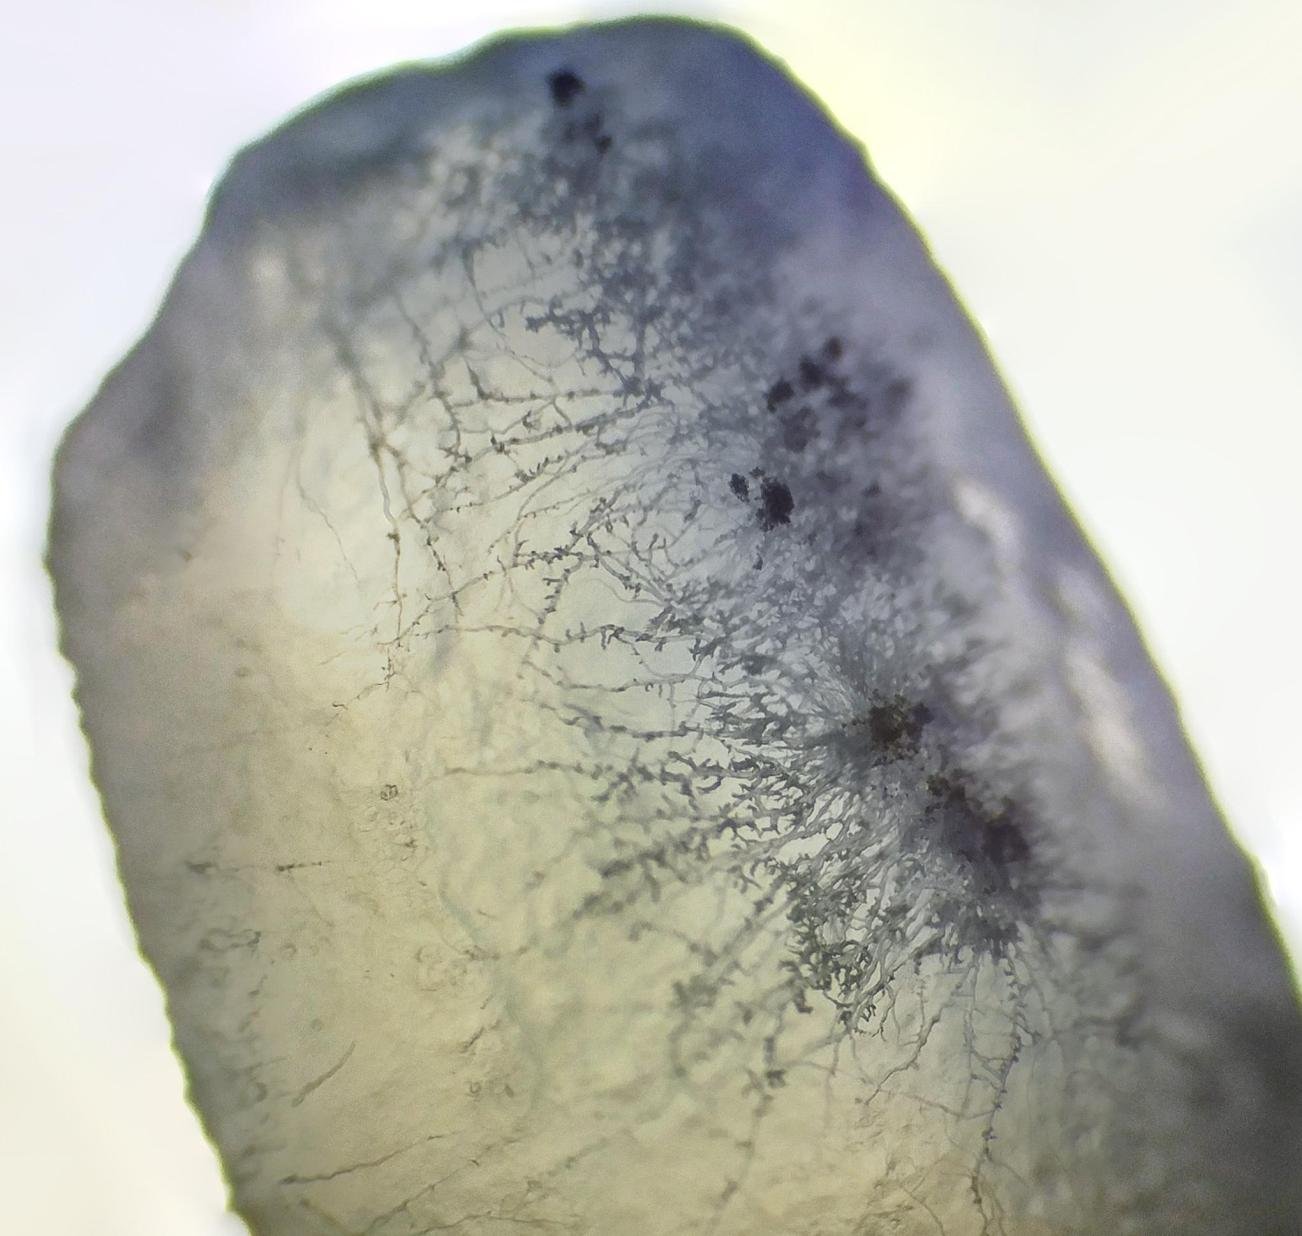
Beginning of koji growth on a grain of rice. Focus-stacked microphotography, 2021, Mike S.
Koji Growing Discussion
We asked brewers about their koji making practices. Here are the notes from a few submissions we discussed. To not double up on everything we only broke out the steps for the first two examples, but for others, we just added the notes where they differed from the first two.
If you are interested in the details we have the responses here and can see all the details.
-
General
Uses Ueda method or cedar trays
Rice type: Hitomebore and short grain varieties, 65-75%
Koji Spores / Ratio: Higuchi Hikami A, Hikami Ginjo (30-100% of suggested ratio)
Tools: No humidifier, dehumidifier, or space heater. Just a simple heating pad to maintain the chamber temperature.
Soaking
0.5-2.5 kg dry weight. Using calculator to identify target weight, eg. 1.3 (30%) x 2.5 = 3.25kg
Soaks for 10-15min, shakes off water (does not use a shop vac to pull off water) and weighs it. This assumes that the water that doesn’t shake off will absorb into the rice.
If the weight is over 3.25kg after shaking it off, then you’ve probably overshot
Steaming
Pressure steam for 20-30 min @ 12psi (yes, in a pressure cooker), with a fake rice layer in the steamer basket to keep the rice from becoming sticky by condensing steam.
Uses a cooling rack in an oven to cool in a relatively sanitary place
Inoculation
When using the Ueda method focuses on moisture content and not just temp, because the home brew batch size will easily get back to target temp once in the incubator. Tries to bring rice down to 28-30% moisture content before inoculating. Willing to wait an hour or more to dry out the rice in order ensure consistent growth using the Ueda method.
Uses powder starter (between 30-100% of package suggested ratio)
Rice temp 30°C, Chamber 32-33°C
Dekoji
At 14-16% moisture level, further dried to 12-15%, first by leaving the rice out at room temp and then transfering to the fridge.
Notes
Moisture rate at time of inoculation is the most important number to shoot for as it determines the trajectory of the koji growth curve.
-
General
Semi-automated table koji
Rice Type: Yamada Nishiki 60%
Koji Spores: Ginka, Hi-G, Hikami A, Special Ginjo
Tools: table scales, large walk-in koji room, digital thermometers, dehumidifiers, ceramic wall heaters, blankets, HEPA Filtered air, Maruzen rice washer, false bottom table with computer fans to push air up through the rice.
Soaking
125kg batches x 2 tables, 10kg / bag in polypropylene bags
Water at constant temp 10°C
Note: after washing rice, uses shower head hose to clean off stuck-on bran
Soak averages about 30% absorption, but each bag varies from broken grains
Uses conical funnel and shop vac to pull excess water off the rice so we could weigh the rice since a 10kg bag would take a while to drain on it own. 1-2 min per bag.
Wait 45 min to ensure kashi “crushability”, indicating total water diffusion into grain
Steaming
40min ideal. less time and not all the rice would gelatinize, more time and the rice would be too mushy. Changes based on the type of rice. Calrose is full 60min, Pirogue is also 60min.
Cool to 34-36°C on Dunnage racks then bring into Koji Mura
Inoculation
Room at 30°C, Mix Rice until it hit 34°C
Inoculation done in 3 passes of 1/3 of the total spores. Use a “furui can” from Higuchi Moyashi to distribute spores. Do not use any flour or other filler mixed spores. Flip and them mix the rice between passes.
Originally used Ginka spores from Akita Konno, but found Hi-G from Higuchi produced a smoother/cleaner flavor with the kake-mai we were using.
Approx. usage is 55% of suggested quantity on package.
Kirikaeshi
Attempted to remove this step to reduce staff labor requirements, but that negatively affected the quality of the koji. Thanks to Mike S. we returned to using this practice and better understood its purpose to dry out the grains and homogenizing the germination rate across the table. Usually the koji had maintained
6 hours after inoculation, the mountain is broken down to smaller than golfball sized chunks or and individual grains if possible.
The table might drop by about 1% in weight from the moisture lost during this period.
Mori-shigoto
Rice temp is about 31-23°C and the Room temperature controller is set to 30°C.
Rice is piled up on 1/4th of the table to keep the koji from losing too much heat. The moisture trapped in the grains is great to help germination as well.
Naka-Shigoto
When the koji has hit 36°C we mix it again and spread it out across the table.
The room temp is set to 35°C to prevent the koji cooling too much when mixing.
Shimai-shigoto
When the koji has hit 41.5°C we mix down again but do not form hanamichi (rows)
The room temp is set to 39°C and no more contact is made with the koji until morning. Table fans will automatically turn on when inkbird probes in the koji hit 42°C which pushes dry chamber air through the koji and forces hot moisture into the room. The room is kept at 39°C to prevent moisture build-up between the grains, which would cause undesirable matting.
Dehumidifiers turn on when the room fills with moisture and return the room to make 70% humidity.
Dekoji
Before dekoji there are a few mixes done by hand to breakup small clumps from overnight.
When the koji weight is down to 120%, HEPA filted air is pumped into the room at 20°C to cool the koji and dry it out for at least 1 hour.
Koji is moved to sanitized walk-in where it is mixed until the koji loses another 2-4% of moisture and then is bagged and stored in freezers.
-
Notes
Home brewer on his 9th or 10th fermentation
60% Polish vs Table Rice: table rice seemed to take forever to soak and wouldn’t ever seem to take up enough water, whereas 60% polish only took 6 minutes to hit 30%. The table rice also started to break down in the water and would become sticky in the
Uses a homemade cedar incubator and cools his rice after steaming. He allows the rice to rest for a while until the rice hits an ideal consistency and texture he can identify.
Has experimented with various amounts of spore to rice ratios, but reduced it for his most recent batch to 0.3g/kg.
Noticed a substantial difference in humidity management from New York and Santa Barbara. New York requiring more control.
Just like Mike mentioned, Brewer Q also noticed that inoculating with less moisture in the rice reduced the amount of times he need to get up in the middle of the night to mix the koji. The temperature was more controlled.
They brought up a note that the industry really needs a better inkbird alternative that works on 5Gz and automatically graphs or reports data.
-
Notes
Uses Calrose 70%, 33-34% absorption rate target
Koji spores: Higuchi Hikami A, Ratio: 0.15g / kg
Steams for 50-55 min, to ensure the rice is fully gelatinized, uses hineri-mochi to determine steaming completeness
Method: Table Koji, Room is kept at 30°C
Cools rice on the main table and allows the moisture to increase the humidity of the room
Inoculation
Room is 30°C at 85% humidity
Rice is 40°C
Cools during inoculation to 35°C before wrapping it in canvas
Kirikaeshi will measure 33°C, meaning it has dropped a bit since inoculation
Doesn’t force timings, just waits for koji to hit temp targets and then performs each mix.
Mori is 35°C, Naka is 38-39°C, Shimai is at 40°C
Table Fans are used, similar to Lucas S. to blow air through the koji and keep the temp between 42-44°C
Dekoji
Fans will blow on the surface of the rice for 4-5 hours. Rice is bagged and weighed, getting to around 17% final moisture rate.
-
Notes
Rice: 7+ types of rice, mostly Gohyakumongoku, Hinohikari at 35, 60, 70% polish
Even Koji rice is soaked the night before and drained overnight
35% polished rice is carefully soaked to 32%, but other rice is just ballparked by visual inspection
Steaming
50min for most rice, 60min for daiginjo
Steamer has a vent that allows the temperature to get up to 100C before entering the chamber. Once it hits that temp the vent is closed and the timer is started.
Inoculation
Rice is brought into the muro at 36-39°C, Room is kept at 32°C
Rice is spread around and cooled to 31-32°C before inoculation
Moisture of rice at inoculation is 32%
Water Chemistry
First off, we know this is a giant topic. So this discussion was more so to have a chat about the various differences in brewing water that some people around the world are using. Many brewers contributed to the conversation and we tried to extract the main points here.
Miyamizu …
Well, we have to start here for nothing else than to plug the SakeDeepDive episode that tries to address that almost cult-like obsession over “Miyamizu” water and how the fundamental reasons this water gained it’s fame was probably more closely related to the hardness and nutrients which provided a vigorous ferment and therefore avoided contamination, than that of its flavorl
Basically, it would seem people confuse the mineral content being somehow more inherently flavorful than other sources with a strong yeast fermentation preventing contamination. In reality, koji growing and moto preparation have far more to do with flavor. Water chemistry can impart some detectable flavors and aromas, but it is likely not noticed as much as other changes that can be made unless they are extremes.

“The difference between elements and their ions. Chlorine gas kills, chloride is essential for life.”
Mike S. made some textbook art to illustrate and appreciate the challenges of understanding this very dense topic.
We asked Reade H., an accomplished professional with a Masters in Brewing and Distilling, currently overseeing a large portfolio of alcoholic and non-alcoholic beverages, to give us his take on this topic and we rounded it out with lots of other professional and home brewer experience.
Reade began by quoting his first brewing professor, “Water is as important as you make it”. You can get extremely complicated if you want to, but you’ll never match a profile exactly and its better to figure out how to work within multiple environments with a simpler solution than dealing with the changing profiles throughout the year and in different locations.
Before any water source touches any part of the process, Reade’s team does a TOA (Taste and Odor Acceptance test). “Water is an incredibly soluble substance so it will pick up flavors from pipes and random bacteria, so just because its suppose to be clean, always check it”, he said. “At all of our facilities we do a water test to analyze all the minerals at least once a week and sometimes more often”.
Regarding water treatments:
Calcium above 50ppm is required for yeast flocculation. Sake has a filtering step in many cases and this is not always required, but natural flocculation will occur much slower without the calcium present. Just waiting for it to fall out of solution is how pilsners are typically fermented, for a beer comparison.
Magnesium is a good thing to monitor. Below 30ppm is ideal to avoid taste sensory perception. You should have a little because it is good for yeast stability. While calcium will be priority for the yeast, without enough of it, they will go for magnesium.
Bicarbonate is not something super necessary in Sake, but does help with pH stablization. NOTE: if you use RO water and it sits around for about a week, it will become acidic and settle around 4-5pH. It’s important to know because people don’t always test pH water early on, and later in their fermentation they are surprised at how low it is. You need to add other things to compensate.
Sulfates are not great. If you are high in sulfates, you’re giving bacteria and other biologicals the tools to make H2S, which is “Rotten Egg smell”
Sodium should be between 3-5ppm but less 100ppm. You can actually identify it at PPBillion, so you don’t need much and over 100ppm it is too strong (you’ll taste salt). It is very important for body and mouthfeel. Yeast also use this, but it contributes more to mouthfeel.
Chloride is okay below a certain threshold. It can help with the saltiness flavor.
Zinc is massively important. Yeast use zinc pumps as part of their cell wall formation. 1-3ppm is all that is needed, but without it, the yeast health can really suffer or even die. This is especially true for highly polished rice because the normal source of it is in the grain. This is the secret ingredient of every commercial yeast nutrient.
Iron should not be present at all. This will cause discoloration. For further reading please see Deferriferrichrysin.
Sodium Citrate changes the sensory mouthfeel. When added to the ferment it will make the sake taste “fuller”. Seltzers can benefit from this to increase perception of the sake as more “dense” or “full”.
Finally, “There are some water sources you just can’t change. Trying to strip everything down and then add the proper things back will drive you crazy.”, Reade continued. “HPRO produce really clean water that is so clean, that it will actually eat your tanks, … so you have to be careful about that”.
Think about where you are storing water and how you are storing water so you know what it can be picking up, because water is easily affected by it’s environment, so always do a TOA before you brew.
Recommended Reades
Other important brewer details from the calls are as follows:
Bob T. - Uses local water in Alaska, which is fairly soft and stays a somewhat constant temperature year round. Water contains: 27ppm Calcium, 4ppm Magnesium, 5ppm Sodium, 2ppm Chlorine, 38ppm SO4, alkalinity 52, pH 7.8
- Adds Potassium Chloride, Magnesium Sulfate: potassium for yeast metabolism, Chloride to help boost flavors, and magnesium for yeast nutrient. Hoping to keep sulfate levels down though, which he has seen contribute to rough flavors, especially with table rice.
- Calcium used for stabilizing alpha and beta amylases during the mash and also for yeast flocculation.Lucas S. - A main take away from a comparative side-by-side test conducted on various types of rice and various water chemistries was that gypsum imparted a chalky taste that was undesirable. The compound was part of a brewing recipe that he was asked to produce and it ended up added a somewhat bitter and astringent after taste. It was determined that this should be removed from the recipe.
Rice Types for Brewing outside of Japan
Unless you have some sort of private growing arrangement with a farm, your options for rice outside of Japan can be limited when compared to the options you see printed on the labels of your favorite sake.
In the US, brewers are the most fortunate, having access through IIDA Group, Valley Select, and the most flexibile company to date, Isbell Farms, who provides polished sake rice not only for commercial purposes, but have ensured through their new company Cypress Creek Milling that home brewers will also have access to their range of polished sake rice.
Nancy Matsumoto wrote that Isbell “received seeds for Gohyakumangoku, Omachi and Wataribune rice from GRIN-Global (Germplasm Resource Information Network)”, but they also offer Yamada Nishiki and Somai as well. They used to offer Calrose, but switch to Somai, of which they will not disclose the ancestry, but advertise that is is less sticky than its predecessor.
Valley Select, a California based rice producer, boasts the following short grain varietals: Koshihikari, Calhikari, Akitakomachi, Hitomebore, Calamylow. They also offer the widely consumed Calrose rice and will even provide custom polishing. They big downside is of course for home-brewers. As of the end or March 2023, there are not 10 or 20kg options for purchase, only large commercial orders.
IIDA Group doesn’t have a posted list of sake rice varietals available, but they can help to import rice from Japan and they do have domestic production and milling capabilities.
In Canada, Central America, and South America, rice is either imported from Japan, or table rice is used. Brazil has Satake milling machines (as does Houston, TX), but to our knowledge they are not used for polishing rice beyond the standard 90%. Asuma brewery in Brazil, now owned by Kikkoman doesn’t list the source of their rice, but they sell Ginjo products. It is possible that there is a a more established polishing operation that we have information for. We have reached out and will let you know.
Our own Mike S. has been working on a home brew version of a rice polisher with great success compared with most of the purchase options people usually find on the internet, such as the Twin Bird, which mostly just grinds rice into a bunch of broken grains. Mike’s mechanical engineering background has come in very handy as his experiments have yield lower than 70% seimaibuai for a reasonable cash and time investment. We’ll post an update on that later this year.
In Europe, most brewers eventually use Arborio or Carnaroli. Arborio being that nice starch cousin to ideal sake rice that actually contains a decent shinpaku occurrence and a large grain. But in the UK, companies like Kanpai are importing rice from Japan at a premium, no doubt, but that seems to be worth it to them.
We haven’t collected any information on Africa or Australian rice farming for sake, but we know that Aussies are importing Japan grown rice to brew with.
What is the English word for Shinpaku?
Sake rice in Japan often gets rated on shinpaku occurrence and its been troubling that there hasn’t been an English work for that. Well, it turns out there is an English word for that. It’s called Chalk. Other terms are “white-core” or “opaque center”. There is another great research paper on Rice starch properties and polishing characteristics which thankfully doesn’t need to be translated. Hopefully people looking to understand more can use this word “chalk” to dig up additional research from non-sake applications.
In most table rice scenarios this is actually considered terrible because it makes the rice more brittle and therefore susceptible to broken grains. But, thats precisely one of the reasons the rice polisher has been evolved in Japan over the years to prevent cracks in the rice despite its brittle nature.